Multiecuscan app for iOS
Both Windows and iOS version have the same coverage and the same functionality. The iPhone/iPad version, however, is completely separate from the Multiecuscan for Windows and it is also more expensive. It can only be purchased from Apple’s App Store and it is not linked to the Windows’ version.
The licensing is also different - it can be purchased only for a year and stops working after the period expires.
Also, for the iPhone version you will need an iOS certified Bluetooth/BLE interface or a WiFi interface. The iPhone Multiecuscan app works only with CANtieCAR v4.x/v5.x WiFi, CANtieCAR v5.x BLE, ELM327 WiFi, OBDLink MX WiFi, OBDLink MX+ Bluetooth, Vgate vLinker BLE/WiFi. It does not work with other interfaces.
The iPad version of Multiecuscan also works on the newer MacBooks with M1/M2 chips. You can install it directly from the AppStore.
Main screen
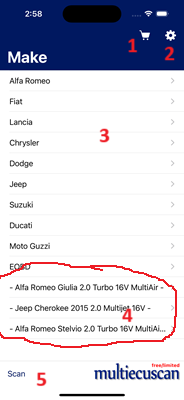
1 - Click on "cart" icon to open actrivation screen
2 - Click on "gear" icon to open settings screen
3 - Here you can select vehicle make, then model, then version and will reach to system selection screen
4 - This is a list of recently connected vehicles. Here you can select one of the vehicles and go directly to system selection screen
5 - Click the "Scan" button to perform full scan for modules and DTC codes in each module
Activation
The activation is from inside the app - click on the “cart” icon (number 1 on the screenshot above) and buy 1 year subscription. The same subscription works on all apple devices (iPhones/iPads/MacBooks) which use your Apple account.
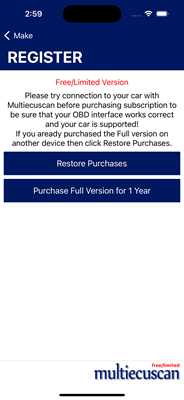
When you install it on a new device - you have to click the “cart” icon and select “Restore purchases”.
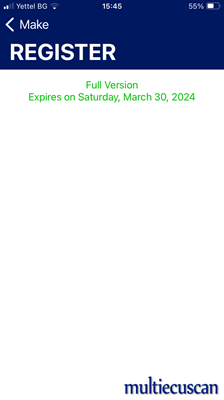
When the full functionality is activated, this screen will display the expiry date.
Configuration
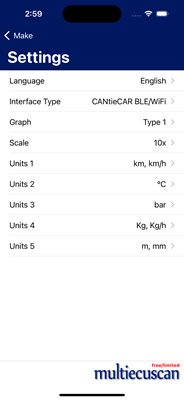
The settings screen allows to set language, type of OBD interface, graph type and scale (for the Parameters view), units.
Currently the Multiecuscan App supports the following OBD interfaces:
- CANtieCAR v4.x/v5.x WiFi - The interface should be updated with recent firmware and switched to WiFi mode (from the SYSTEM.INI file which is in SYSTEM folder on the flash drive).
The CANtieCAR should be plugged into OBD port of the car and the RADIO led on back of interface will blink in white to indicate that it works in WiFi mode.
The iPhone/iPad/MacBook should be connected to CANtieCAR_WTCxxxx WiFi hotspot.
- CANtieCAR v5.x BLE Bluetooth - The interface should be updated with recent firmware and switched to Bluetooth mode (from the SYSTEM.INI file which is in SYSTEM folder on the flash drive).
The CANtieCAR should be plugged into OBD port of the car and the RADIO led on back of interface will blink in blue to indicate that it works in Bluetooth mode.
No further configuration required on the iPhone/iPad/MacBook.
- OBDLink or Vgate vLinker WiFi - The iPhone/iPad/MacBook should be connected to the WiFi hotspot of the OBD interface.
- OBDLink MX+ or Vgate vLinker FS Bluetooth - The iPhone/iPad/MacBook should be paired and connected to the Bluetooth device. This should be performed from the Settings app on the iPhone/iPad.
- Vgate vLinker BLE - No pairing/configuration required on the iPhone/iPad/MacBook.
- ELM327 WiFi - The iPhone/iPad/MacBook should be connected to the WiFi hotspot of the ELM327 interface.
Please note that Multiecuscan App will needs permission to use WiFi and Bluetooth on the iOS device.
It will ask for this permission the first time, but in case you have disallowed it by mistake then you can check this in the iPhone's Settings app:
Settings -> Privacy & Security -> Local Network -> Multiecuscan (turn ON).
Settings -> Privacy & Security -> Bluetooth -> Multiecuscan (turn ON).
The connection with WiFi interfaces may also be interrupted by the "Wi-Fi Assist" function on iPhones. This function usually does not cause problems, but you can try to turn it off if you have problems with the connection between iPhone and OBD adapter:
Settings -> Mobile Service (scroll to bottom) -> Wi-Fi Assist (try to turn OFF)
Scan vehicle/modules
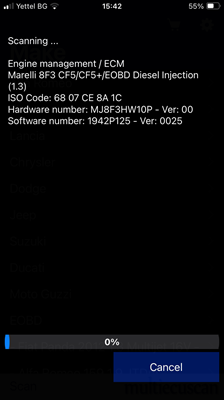
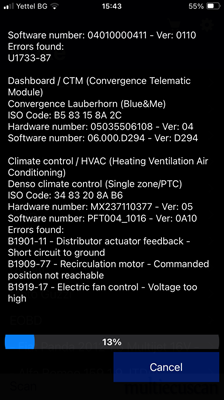
Click the "Scan" button on main screen to perform full scan for modules and DTC codes in each module. The app will display the SCAN screen and will start the scanning process. The full scan usually takes a few minutes and the app will display the progress.
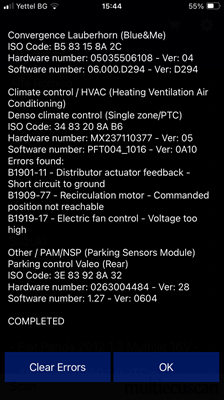
When scan is complete, and Multiecuscan has found error codes in one or more modules, it will display "Clear Errors" button. You can tap on this button to clear all error codes from all modules.
Connect to vehicle/modules
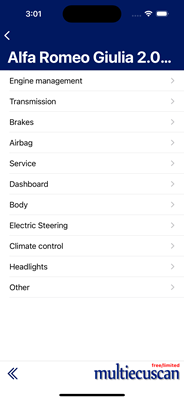
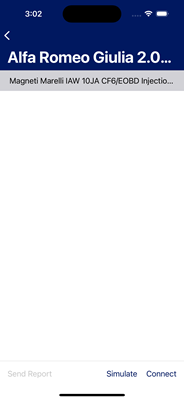
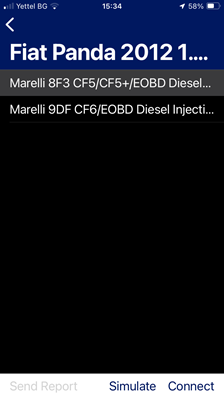
Here, you can select system type Engine, Brakes, Transmission, etc. Then Multiecuscan app will display a list of available control module models.
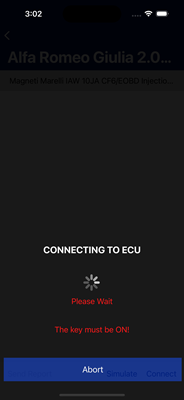
You have to select a module from the list. Then tap "Connect" to begin the communication with selected module.
Upon successful connection Multiecuscan will display the "Info" screen.
You can also tap "Simulate". This will start a demo connection with the module (it will display fake/test data, no actual connection to vehicle). You can use this to explore functionality without need for vehicle and OBD interfaces.
Here, it also possible to swipe left/right instead of tapping on Connect or Simulation buttons.
Info screen

The app will display this screen right after successfull connection to a module. It contains identification information about the module.
Here you can tap "Disconnect" (number 1 on the screenshot above) to stop communication with the module and go back to system selection screen.
Tap on icons 2, 3, 4, 5, 6 to switch between "Info", "Errors", "Parameters", "Actuators" and "Adjustments" screens.
Errors screen

This screen will display stored error codes from the connected module.
The error codes are meant to help with identifying and fixing problems on the car.
Some of the error codes may be displayed in red - this means that the fault is still present (still detected by the control module) and the error code will most probably re-appear right after clearing.
You can tap on "Clear errors" (top-right of screen) to clear all stored error codes from the module. Please note that these errors might re-appear if the actual problem, which caused them in the first place, is not fixed.
You can swipe left any of the error codes on screen and select "Details" to display additional information about the fault.
Parameters screen
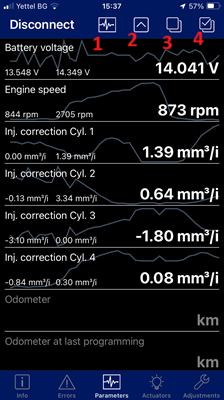
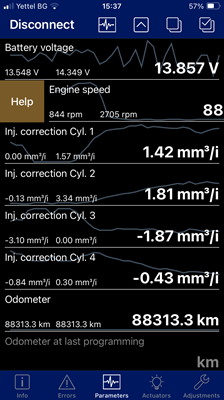
This screen will display the live data parameters for the connected module.
You can tap on any parameter to start reading live data from the car. You can tap again to stop the live data. The screen will also display a basic graph of the live data. The type of graph can be changed in Settings.
You can swipe right any of the parameters on screen and select "Help" to display additional information, if available.
You can tap on icon 4 to mark/select all parameters and start reading live data for all of them. You can also tap icon 3 to unselect all parameters.
If you want to have high refresh rate of the data then it is recommended to select as few parameters as possible.
You can tap icon 2 to move all selected parameters to the top of the list.
You can tap icon 1 to display full-screen graph of selected parameters.
Actuators screen
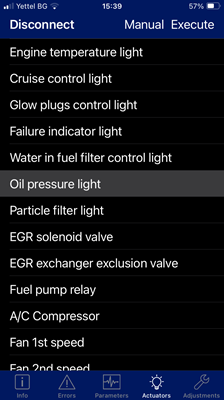
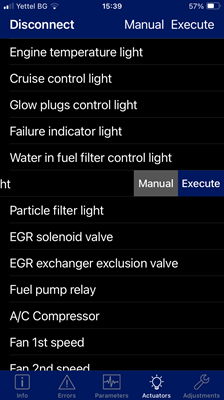
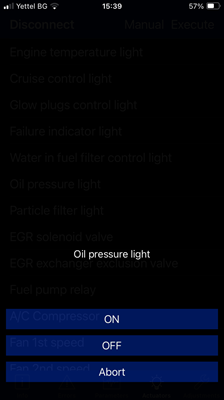
This screen will display the available tests for the module.
You can tap on any test to select it. Then you can tap on "Manual" or "Execute" to perform this test. You can also swipe left for these options. The manual option allows for manual selection of states (like on/off), while the execute option performs automatic test sequence.
You can swipe right any of the tests on screen and select "Help" to display additional information, if available.
Adjustments screen
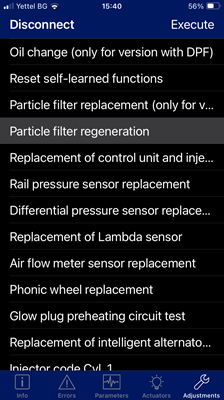

This screen will display the available procedures/calibrations.
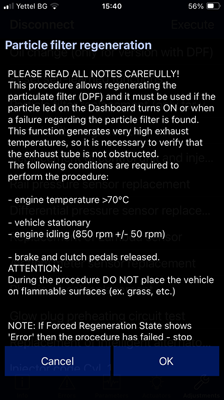
You can tap on any procedure to select it. Then you can tap on "Execute" to start the procedure. You can also swipe left for execution. The app will display additional requirements before execution.
You can swipe right any of the procedures on screen and select "Help" to display additional information, if available.
|
|
|